Clean and Inspect Mussels Like a Pro in 5 Easy Steps
Love the taste of mussels, but worry about cleaning them? Relax! Cleaning and inspecting mussels is easier than you think. This tutorial breaks it down into 5 simple steps so you can enjoy those delicious bivalves with confidence. We’ll cover everything you need to know, from the tools you’ll need to identify fresh mussels and discard any unwanted guests. Let’s get started to learn how to clean and inspect mussels before cooking.
The Importance of Cleaning and Inspecting Mussels Before Cooking
Mussels are a delightful seafood delicacy, offering a burst of briny flavor in countless dishes. But before you toss them into your favorite recipe, a crucial step ensures a safe and enjoyable experience: cleaning and inspecting them thoroughly.
The Perils of Skipping Mussel Prep: Dangers of Uncleaned Mussels
Uncleaned mussels can harbor a variety of health risks. Here’s what you need to be aware of:
- Mussels are filter feeders, meaning they can accumulate harmful bacteria, viruses, and toxins from the water they live in. Consuming these contaminants can lead to unpleasant foodborne illnesses like diarrhea, vomiting, and stomach cramps.
- In some cases, mussels may contain biotoxins from harmful algal blooms. These toxins can cause paralytic shellfish poisoning (PSP), a serious illness with symptoms ranging from numbness and tingling to respiratory failure.
- Uncleaned mussels often contain sand and grit, which can be unpleasant and ruin the texture of your dish.
Reap the Rewards: Benefits of Cleaning and Inspecting Mussels Before Cooking
Taking the time to clean and inspect your mussels offers numerous benefits:
- Proper cleaning removes harmful bacteria, viruses, and potential biotoxins, significantly reducing the risk of foodborne illness.
- Removing sand and grit ensures a clean and enjoyable eating experience.
- Knowing your mussels are clean allows you to relax and savor the delicious flavors.
- Inspecting mussels helps you discard any dead or damaged ones before cooking, saving you money and preventing unnecessary food waste.
By making cleaning and inspecting mussels a routine part of your preparation, you’re not just safeguarding your health, but also maximizing your enjoyment of this versatile seafood.
Tools for Cleaning and Inspecting Mussels: Your Essential Mussel-Prep Kit
Now that you understand the importance of cleaning and inspecting mussels, here’s what you’ll need to gather before you get started.
Colander: A large colander is your workhorse for this task. It will be used for soaking, rinsing, and draining your mussels throughout the cleaning process. Choose a colander with a sturdy base and large enough to comfortably hold all your mussels at once.
Stiff Brush: A stiff brush is essential for removing any stubborn dirt, grime, or barnacles clinging to the mussel shells. A vegetable brush with firm bristles works well, but avoid anything too harsh that could damage the delicate shells.
Knife: A small, sharp knife can help remove stubborn mussel beards, especially if they’re particularly thick or tangled.
Bonus Tip: Having a pair of kitchen gloves on hand can protect your fingers from any sharp edges on the shells or potential irritation from prolonged contact with saltwater.
5 Pro Steps to Clean and Inspect Mussels Before Cooking
As you gather the supplies, let’s dive into the process itself. Here’s a step-by-step guide to ensure your mussels are prepped for culinary success:
step 1: Soaking Mussels in Saltwater Solution
Fill a large bowl or colander with cold water. Add salt at a ratio of 1 tablespoon of salt per gallon of water. This mimics the mussels’ natural seawater environment and encourages them to expel any sand or grit. Then submerge the mussels in the saltwater solution for 30-45 minutes. During this time, discard any mussels that float to the surface, as these are likely dead.
Step 2: Removing Mussel Beards
Mussels have fibrous strands called “beards” that attach them to rocks or other surfaces. Grasp a beard firmly between your thumb and forefinger. Then with a gentle yet firm tug, pull the beard towards the hinge end of the mussel. This detaches the beard without damaging the mussel itself. Discard the removed beards. Repeat this process for all the mussels, ensuring a clean and beard-free batch.
Step 3: Scrubbing and Rinsing Mussels
Using a stiff brush (but not so stiff that it damages the shells), gently scrub the shells of the mussels to remove any remaining dirt or debris. Then rinse the mussels thoroughly under cold running water to remove any loosened dirt, sand, or remaining saltwater solution.
Step 4: Discarding Dead or Broken Mussels
Having cleaned your mussels, the next step is a thorough inspection to ensure only the freshest and safest ones make it into your dish. Here’s how to effectively inspect your mussels.
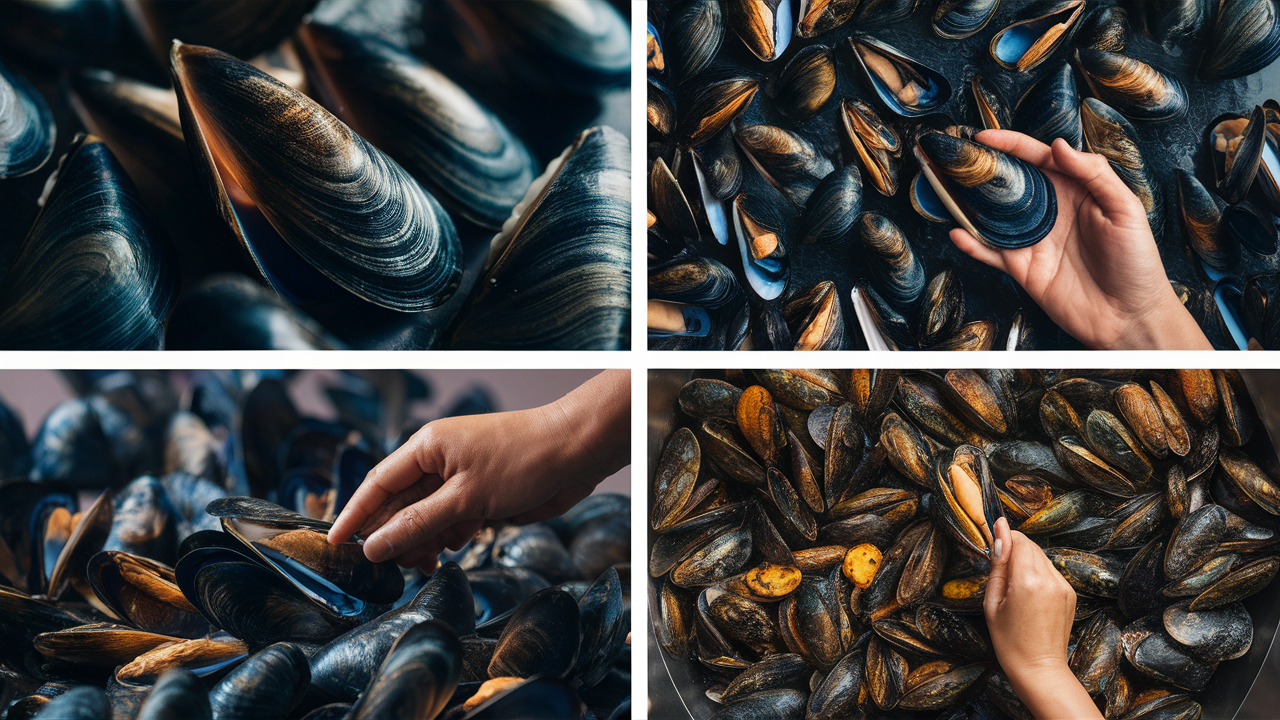
Identifying Live vs Dead Mussels
Live mussels should have tightly closed shells. A gentle tap on the counter should prompt them to close even tighter. Discard any mussels with shells that remain gaping open, even partially. These mussels are most likely dead and unfit for consumption.
Fresh mussels should have a mild, ocean-like smell. It’s not a bad smell, but a clean, slightly salty aroma. Think fresh sea air by the beach. Discard any mussels with a strong, fishy odor. This is a clear sign of spoilage and indicates the mussel has begun to decompose.
Some cooks recommend a very gentle “wiggle test.” Hold the mussel by the base and gently nudge it side to side. A live mussel may have a very slight movement within the shell as it attempts to stabilize itself.
Important Note: Be very gentle and avoid any excessive squeezing or manipulation that could damage the mussel. Discard any mussels that feel mushy or detach from the shell easily during this test.
Checking for Broken Shells or Damaged Flesh
Inspect each mussel shell carefully for cracks, chips, or large gaping holes. Minor nicks or hairline fractures are acceptable, but discard any mussels with significant breakage, as these may not cook evenly or pose a safety risk due to potential contaminants entering the flesh.
While mussel shells naturally vary in color, be wary of any mussels with significant discoloration or abnormal markings. Fresh mussels should have a uniform, natural-looking shell color.
Once you’ve discarded any mussels with damaged shells, take a peek inside. The flesh of a fresh mussel should be plump and have a creamy or light orange color. Discard any mussels with discolored flesh, particularly if they appear grayish, brown, or mushy.
Step 5: Visual Inspection for Foreign Objects
Give your cleaned mussels a final visual inspection before cooking. Look for any foreign objects like sand, grit, or seaweed clinging to the shells or nestled between them. Discard any mussels with visible debris that wasn’t removed during the cleaning process.
By following these steps, you can ensure that only the freshest, safest mussels make it into your culinary creations.
FAQs: Cleaning and Inspecting Mussels Like a Pro
Now that you’ve grasped the essentials of cleaning and inspecting mussels, here are some commonly asked questions to address any lingering doubts:
1. How long to soak mussels?
The ideal soaking time for mussels is typically 30-45 minutes. This allows them to expel any sand or grit trapped within their shells. Discard any mussels that float to the surface during soaking, as these are likely dead.
2. What to do with the soaking liquid?
The soaking liquid for mussels should be discarded. It may contain sand, grit, and any impurities the mussels released during soaking. It’s not suitable for cooking purposes.
3. Is it safe to eat broken mussels?
It’s best to avoid eating mussels with broken shells. Cracks or large holes can compromise the integrity of the shell, potentially allowing contaminants to enter the flesh during cooking. Additionally, broken shells can pose a choking hazard.
4. What are alternative methods for cleaning mussels?
While the saltwater soak is the most common method, there are a few alternative approaches:
- Running Water Rinse: Some methods advocate for simply rinsing the mussels under cold running water for several minutes to remove sand and debris. However, the soaking method is generally considered more effective for drawing out any deeply ingrained grit.
- Desanding with Cornmeal: A less common technique involves soaking the mussels in cold water with a sprinkle of cornmeal. The theory is that the cornmeal attracts and absorbs any sand particles within the mussels. However, the effectiveness of this method is debatable.
No matter which cleaning method you choose, thorough inspection remains crucial to ensure the safety and quality of your mussels.
I hope you enjoy reading this tutorial on How To Clean And Inspect Mussels Before Cooking. Please click the links below to learn how to cook mussels