
How To Draw a Pumpkin
Fruits, vegetables, and plants come in a wide variety of shapes, sizes, and colours and there are numerous varieties of each.
There are some that are large, some that are compact, and some that, like the pumpkin, seem to tower over the others!
The large, imposing appearance of pumpkins makes them stand out, and the fact that they are used every year for Halloween as jack-o-lanterns makes them much more distinctive.
If you enjoy drawing pumpkins or jack-o-lanterns, you may have wondered how to do it but haven’t known where to begin.
They come in vivid and striking orange colours, which also make them a terrific drawing to colour after being created.
To prove to you that drawing doesn’t have to be difficult, we’ve prepared this amusing and simple tutorial on how to draw a pumpkin in only six simple steps!
You’ll be painting amazing pumpkins in no time if you follow the instructions in this guide.

Starting a Pumpkin Drawing: Here we go!
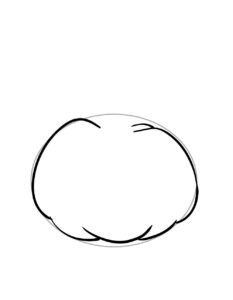
Step 1

You should begin by sketching an oval form using a pencil as the first step in learning how to draw a pumpkin.
Since this will serve as a guide for drawing in the rest of the pumpkin, we’re using a pencil for the time being.
It’s not a problem if the oval isn’t exact if you draw it freehand rather than using a tool like a drawing compass.
Step 2: Draw the pumpkin’s beginning.
We can now begin to draw the beginning of the pumpkin drawing using the pencilled oval as a guide.
Start outlining the pumpkin using some curving lines, using both your pencil oval and the reference image as guides.
If you work from left to right and carefully mimic the lines you see in the image as you draw, it should be lot simpler to complete.
This step could require some skill, so you can always outline the shapes with a light pencil first and then fill them in with a pen if you’re satisfied with the way they look.
Step 3 – After that, remove the markings.

Once you’re satisfied with what you’ve drawn in step 2, you can go over the outline of the pumpkin with a pen or a darker pencil if you initially used a lighter one.
You can remove the guiding oval from step 1 once you’ve drawn it in because we won’t be using it anymore.
If you used a pen, make sure the ink is dry before erasing the rest of the design. You run the risk of smudging the wet ink if you delete too soon. Therefore, at this point, patience is crucial!
Step 4: At this point, draw in the pumpkin’s stalk.

You can now add the pumpkin’s stalk to your drawing after finishing the outline.
As seen in the reference image, you can draw this aspect using some curved and sharp lines. You may reproduce the stalk’s shape to fit neatly atop the pumpkin if you carefully follow the illustration.
Once you get the hang of it, you might also alter the stalk’s position and shape to give your pumpkin drawing a more distinctive appearance.
Step 5: After that, you’ll add the last few details
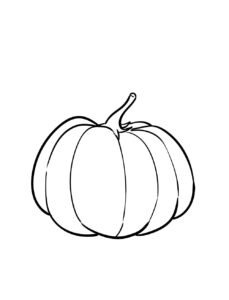
Your drawing of the pumpkin is almost finished at this point! The only thing left to do is to draw a few lines to represent the pumpkin’s various parts.
Draw a line from the upper point to the matching lower point using the points on the interior of the pumpkin outline.
They don’t always have to be solid lines, as you can see in the example image; some of them can have a break in the middle.
You can quickly complete your pumpkin if you take the time to make sure the lines line up properly.
Step 6: The final step is to colour your drawing.

You’ve finished drawing a pumpkin, and you can now consider yourself an expert!
But there’s still one more step, and it’s enjoyable! It’s time to colour in your beautiful pumpkin drawing, letting your creativity run wild.
You might approach this in a variety of ways, so use all of your imagination!
The pumpkin might be coloured in a stunning shade of orange, but you could also use your favourite vibrant hues for a more fashionable look.
Add a jack-o-lantern face and colour it in so that it appears as though candles are lighted inside the pumpkin for yet another amusing finishing touch.
You can also use a wide range of various art supplies, like coloured pencils, coloured pens, acrylic paints, and watercolours, to mention a few!
You can have an almost infinite variety of colour styles for your drawing by using your preferred art mediums.
Read More: How to Draw a Car