
In the 1990s, French manicures rose to the status of a gold standard. French tip nails have gained popularity ever since. There is no way that French women would sport manicures covered with sequin stripes and rhinestones.
French manicures don’t require lengthy nails to be performed. In addition to being utilitarian, short nails also provide a sleek, attractive appearance. Additionally, they are ideal for a gorgeous French manicure. Want to add some Parisian flair to your nails at home without spending lots of money at the salon? No issue! Despite their sophisticated appearance, French manicures are incredibly easy to perform, even without the assistance of a trained stylist. Continue reading for a thorough tutorial on how to do a French manicure at home, including alternative techniques to guarantee precisely equal nail tips.
What materials are need for a French manicure?
- A cup of hot water
- A cloth
- Nail clipper
- Remover of nail polish (if needed)
- Scissors
- Cuticle utensils
- Cotton swabs or apron
- Hand lotion
- Nail polish for a French manicure
- Polish with a clear topcoat
- A plastic bag (if needed)
A French manicure requires a few steps to complete. As we previously stated, the ideal method to complete the task is to acquire all the materials required and then meticulously and consistently carry out each step. Due to repeated bathing and buffing, the cuticles need extra attention because they become extremely fragile and sensitive. A word of advice: visit a salon if you don’t feel that confident. Or ask a buddy who has done it before to do it for you.
However, it is not a challenging technique. The items are practical daily necessities, and achieving the look is simple. So that you know exactly what to do to achieve those lovely French nails, drenched in red, or simply the simple “my-nails-but-better” look, let’s lay down these methods in detail for you. Move along!
Step 1: Get it ready
Preparing your hands and nails for the procedure is the first stage. To remove any filth, grease, or grime, thoroughly clean your hands and your nails. It must be spotless because this will serve as your French manicure’s blank canvas. Remove any leftover nail polish as well. Make sure it is spotless.
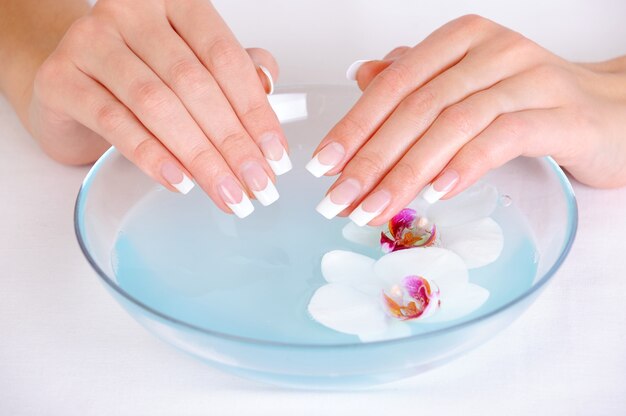
Step 2: Let it soak up
After finishing it, put your hands in a bowl of warm water to relax. Even some sea salt can be added to it to make it more relaxing. When your cuticles have softened after a few minutes, apply a cuticle remover to press them back and into position. Both ends of each cuticle remover are included. The cuticle is pushed back with one end, and dirt that has become trapped under the nails is removed with the other end.
Step 3: Polish it
After you have finished removing the cuticles, buff and smooth the nail’s surface. As a result, the surface is clear and clean for applying the base coat. In addition, it creates a natural gloss by removing the sharp ridges.
Step 4: Apply the base
Apply the base coat right now. Dry it out. Apply your preferred nail paint after that. If you like a more natural look, you can avoid using colored nail paint. Before proceeding to the following step, allow the coat or nail paint to completely dry.
Step 5: Position the nail guides
Place the nail guides on your nails once the base coat is fully dry. It would also work with small bits of tape that cut easily. However, before you put the tapes in place, de-glue them. With the tapes adhering firmly to the nails and then chipping off the meticulous work while being removed, no French manicure was successful. You can accomplish that by applying and removing glue on the back of your hand until only a small amount of adhesive remains to adhere to the nail.
Step 6: Color it
Apply the white nail polish to the nail tips while the nail guides are still in place. Keep it tidy. Wait for the first coat to dry before adding a second if you think it is too sheer. The nail tips should be painted in even strokes so that there are no uneven edges, and it should dry totally opaque.
Step 7: Secure it
The distinct coats on the nail and the nail tip need to be sealed after the nail tip has been painted. Utilizing a topcoat is the most effective method. This completes your French manicure and pretty much seals the deal. After applying the topcoat, allow it to dry completely. You’re done now! In a few simple steps, achieve the ideal French manicure.
Tips for Performing the Perfect French Manicure on Short Nails
These are some of the tried-and-true advice that will give your French manicure the best results.
Tip 1: Always take jewellery and polish traces off
Remove all of your jewellery before performing a french manicure on short nails to avoid irritation. Put aside any bracelets or stackable rings you are wearing before starting to remove nail paint stains.
Consider a non-acetone remover because it will be gentle on your nails and the skin nearby. Also keep in mind that if you have fake nails, a non-acetone remover is essential. If you have extra nail polish, use cotton balls or pads to remove it.

Tip 2: Properly styling your nails
Long and short nails both lend themselves well to styling. Cutting off your nails and shaping them in the desired form should be your first step. Your short nails should be filed with a nail file. The finest nail shapes for short nails are square and oval. Don’t forget to file solely in the back-and-forth motion when doing so.
Tip 3: Remember to take care of your hands, cuticles, and nails
You must take good care of your hands and nails if you want to create the perfect manicure. Natural nail care is really effective. To soften the cuticles, place your hands in a bowl of warm water and soak for a few minutes. Give them at least five minutes to soak in the water. This is particularly useful if your nails pain from having been clipped too short.
Put your hands in plastic bags and soak them in water for at least an additional ten minutes if they are extremely dry. You can nudge the cuticles toward the nail base by using your cuticle tools. Dead skin can be removed with scissors. Apply a hand lotion or moisturiser to your hands after taking care of your cuticles as a last recommendation. Just take care. Be cautious to wipe your nails clean before applying nail polish. Your nail polish won’t properly dry if you don’t.

Tip 4: Apply Base Coat, Tips, and Over Top
The centre of your nail should be your starting point for applying your base coat, followed by the left and right sides. All coats should be quite thin to allow for speedy drying.
Put a basic white hue on your tips. You can DIY or utilise the tape or guide strip that often comes with a French manicure kit. You can perform it without a tape if you are sufficiently assured. The secret is to paint your tip vertically, not horizontally, in the same direction as your base coat. Prior to applying the topcoat of polish, let each coat to dry fully. The entire manicure is finally finished.

Bottom Line
French manicures look elegant and stylish on nails, and they’re also simple to do. Making your nails look great doesn’t have to cost a bunch. You can find the items you need in your home or at the nearby store.
If you’re considering this type of manicure, we can only advise you to go for it, use our instructions, and flaunt your flawlessly manicured nails. The French manicure is, after all, classic.